Tag Archives: Python

Memory increasing issue when convert Pillow Image (8.3.1) either to Numpy array or OpenCV Image

Background introduction

Recently our project encounter a memory increase issue after upgrade from Pillow 8.2.0 to Pillow 8.3.0.

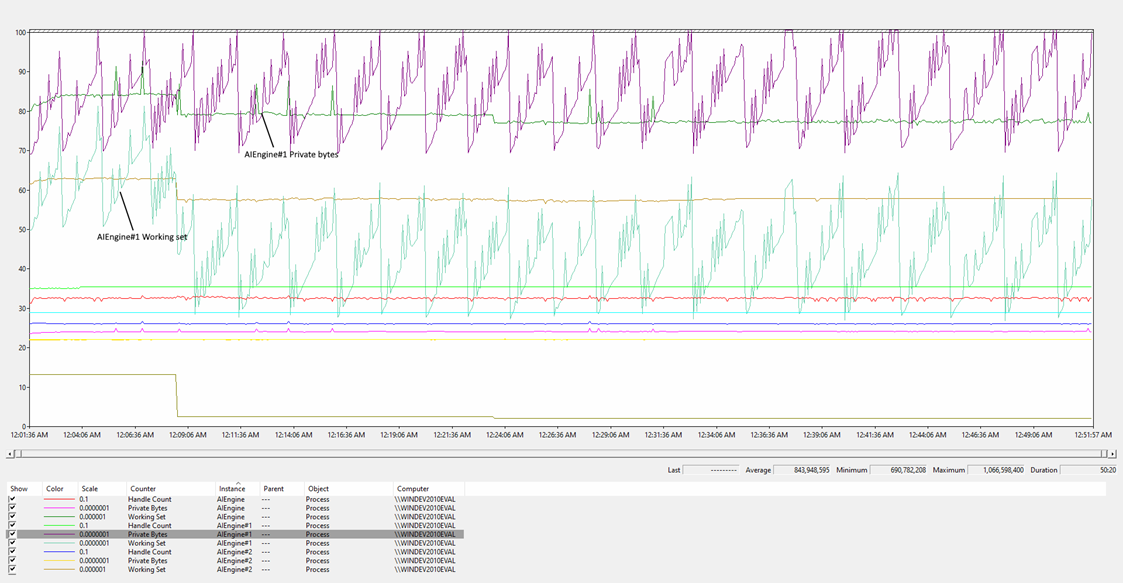
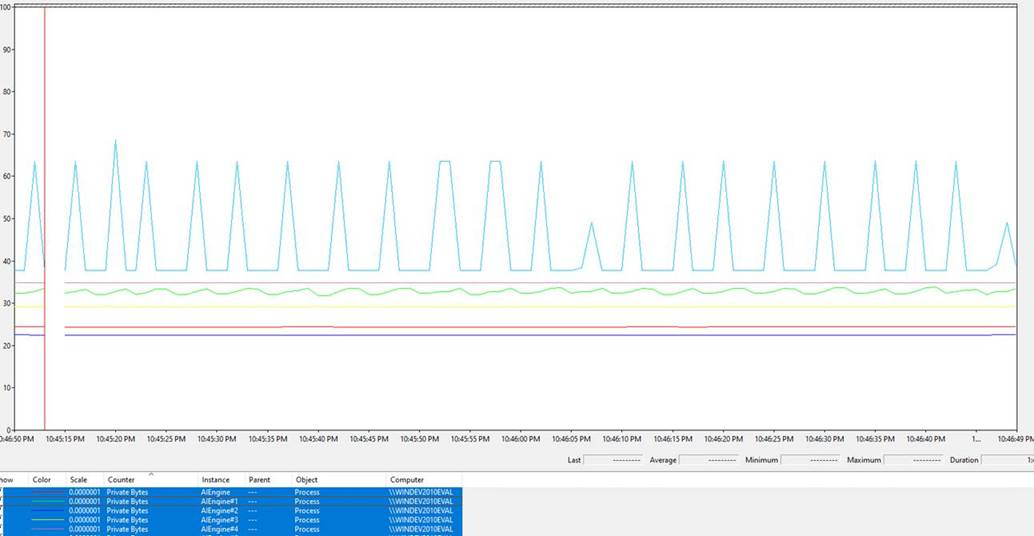
Memory consumption after upgrading the Pillow (8.3.1):

issue

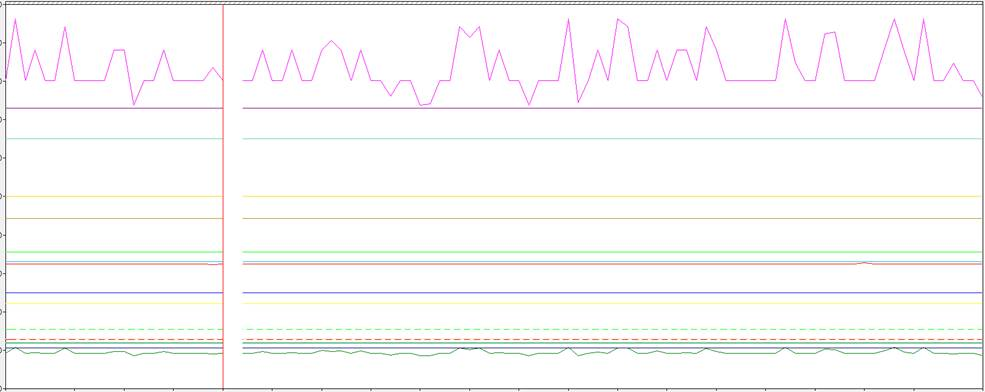
The memory consumption before upgrading the Pillow (8.2.0):

normal

It seems the library bring lots of memory increments. BTW. The issue can not be produce before we build the project.

Solution

After I spent a few days to find the root cause and the solution. The issue code is located to a pillow image conversion

At the beginning, I suspect this would be a regression in Pillow, so I search their github issues

https://github.com/python-pillow/Pillow/issues/2019

https://github.com/python-pillow/Pillow/issues/5180

Both of these two threads indicate the issues are fixed. But I still tried to pull the fix code into our project. Without luck.

To keep the long story short, I grab two heap memory dump and compare with objects which increased most. This great help me reduce the search scope.

stack-trace

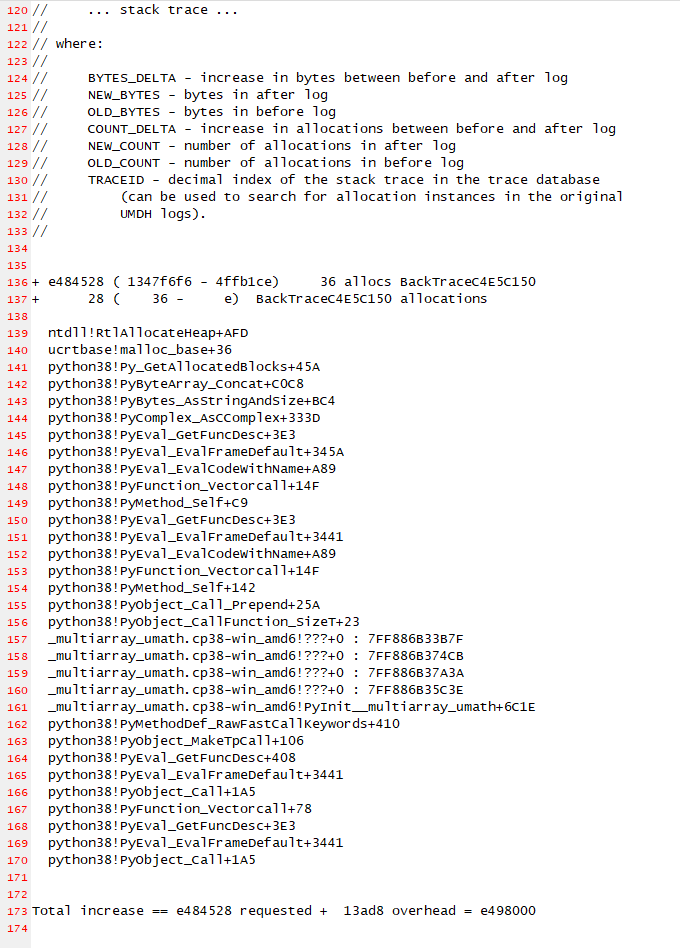
The relative issue code:

  1. np.array(pillow_image, [dtype=...])
  2. np.asarray(pillow_image)


All the above conversion will lead to the numpy array keep exist till a certain point trigger python release the accumulated objects.

Then I check the release note of the Pillow, there is only one place directly relative to numpy array. First I try to withdraw the changes directly in 8.3.1, no help. Second try to directly down grade to 8.3.0. Still not works.

Now, what? Checked Pillow API, Numpy API, OpenCV API again and also check their source. A idea pop up and write a workaround code

  1. numpy_array = np.frombuffer(pillow_image.tobytes(), dtype=np.uint8)

To convert the image array to OpenCV

  1. # 3 or 4 base on your image mode is RGB or RGBA
  2. numpy_array.shape = (*reversed(image.size), 3)
  3.  
  4. # If want to convert the image to BGR then call the OpenCV method
  5. # COLOR_RGB2BGR will required the image mode is 3
  6. numpy_array= cv2.cvtColor(numpy_array, cv2.COLOR_RGB2BGR)

It works! Now the memory consumption return to normal level.

fixed

There are several places directly use the image conversion, we should consider unify the similar logic into a utility class and add a wrapper for the third party library the isolation the influences.

Summary

Third party library upgrade is a risk to a product. We have to upgrade the library due to a security reason in this time. The Pillow changes are checked too, have found several suspicious code will cause the issue. Need time to test, maybe update the result later.


Tips for resolve pip install error for some of the python 2.7 package on window

Pip is a wide used python package management tool, it works properly most of the time. But occasionally there will be a few error when install some special package which may required local build after download.
Here are two common ways to resolve these kinds of error

1. Use a prebuild binary, the most common library could be download from here. But the links seems dead for a while.

2. Install the necessary Cpp compiler for python 2.7 on window from here

After install the compiler rerun the pip install again

Good luck!

Automatic Export About:Config Content Compare the Difference between for Firefox

Requirement:

We need to compare the difference between the configuration changes between the new vision of the FF and the previous version

We wish to compare the configuration setting in plain text. Then we could use the compare tools such as beyond compare or winmerge to give us a quick visual for the difference.

The Problem:

There is not a official way to export the about:confg page from FF into plain text file. There is a prefs.js file locate in the firefox profile folder, it contains some of the configuration setting but not all.

Known solutions to export the about:config but not well enough:

Solution for export the about:config:

Use the GUI automation tool(autoit) to help export the configuration directly from the about:config page. The script is export-opened-firefox-config.au3 which could be download from my github repot

  1. Install autoit, which double be download from official website follow the previous link
  2. Download the export-opened-firefox-config.au3
  3. Before run the script close all the Firefox process existed in the current system
  4. Run the script export-opened-firefox-config.au3
  5. Open the Firefox that you want to export the about the configure content
  6. The script will start automatically and wait for it stops, please make any user input during the script execution
  7. The output.txt will be generated at the same location of the script file export-opened-firefox-config.au3 which contain all the configuration values
  8. Check the last line of the output.txt contain the last item of the about:config. If the values are same then all is well. If not please modify the sleep time for the script to give more calculate time for the low performance system.

Solution for generate the difference compilation results:

Use python to parse and generate the previous generate configuration files and the current user.js settings which contain in the LR-INSTALL-DIRECTORY\dat\FFProfile\user.js. The python script could be check out from my personal tools repo from github

  1. Install python 2.7.x, if current system doesn’t contain python environment
  2. Install xlsxwriter from pip or download the package install manually. Check this link, if you doesn’t familiar with python
  3. Download the script
  4. Copy and replace the about config content files and the user.js into the data folder to make it follow this file structure

2015-12-02_110835

2015-12-02_111617

5. Execute the python script the output files will be overwrite and generated automatically  Note: If the excel file is not required you could common the script lines relative to generate excel to only generate plain text report. The key/value pair is separate by semicolons like this:

2015-12-02_111832

References

Note: the content of the wiki may adapt to the old version of FF to check the new version please follow the link supplied in the wiki pages.


Use Python to Create a Tree View Command Line Tool

In recent days I need to generate a directory free from the window command prompt. As I known there is a DOS tool called tree could do this. But it is not quite fit for my requirement. Here is an example which the graphic generated by built-in tree command in window.

D:\PersonalTools>tree D:\emacs-24.5 /A
卷 WareHouse 的文件夹 PATH 列表
卷序列号为 64CA-A0C3

D:\EMACS-24.5
+—admin
|   +—charsets
|   |   \—mapfiles
|   +—coccinelle
|   +—grammars
|   +—notes
|   +—nt
|   \—unidata
+—build-aux
|   \—snippet
+—doc
|   +—emacs
|   +—lispintro
|   +—lispref
|   +—man
|   \—misc
+—etc
|   +—charsets
|   +—e
|   +—forms
|   +—gnus
|   +—images
|   |   +—custom
|   |   +—ezimage
|   |   +—gnus
|   |   +—gud
|   |   +—icons
|   |   |   +—allout-widgets
|   |   |   |   +—dark-bg
|   |   |   |   \—light-bg
|   |   |   \—hicolor
|   |   |       +—128×128
|   |   |       |   \—apps
|   |   |       +—16×16
|   |   |       |   \—apps
|   |   |       +—24×24
|   |   |       |   \—apps
|   |   |       +—32×32
|   |   |       |   \—apps
|   |   |       +—48×48
|   |   |       |   \—apps
|   |   |       \—scalable
|   |   |           +—apps
|   |   |           \—mimetypes
|   |   +—low-color
|   |   +—mail
|   |   +—mpc
|   |   +—newsticker
|   |   +—smilies
|   |   |   +—grayscale
|   |   |   \—medium
|   |   \—tree-widget
|   |       +—default
|   |       \—folder
|   +—nxml
|   +—org
|   +—refcards
|   +—schema
|   +—srecode
|   +—themes
|   \—tutorials
+—info
+—leim
|   +—CXTERM-DIC
|   +—MISC-DIC
|   \—SKK-DIC
+—lib
+—lib-src
+—lisp
|   +—calc
|   +—calendar
|   +—cedet
|   |   +—ede
|   |   +—semantic
|   |   |   +—analyze
|   |   |   +—bovine
|   |   |   +—decorate
|   |   |   +—symref
|   |   |   \—wisent
|   |   \—srecode
|   +—emacs-lisp
|   +—emacs-parallel
|   +—emulation
|   +—erc
|   +—eshell
|   +—gnus
|   +—international
|   +—language
|   +—leim
|   |   +—ja-dic
|   |   \—quail
|   +—mail
|   +—mh-e
|   +—net
|   +—nxml
|   +—obsolete
|   +—org
|   +—play
|   +—progmodes
|   +—term
|   +—textmodes
|   +—url
|   \—vc
+—lwlib
+—m4
+—msdos
+—nextstep
|   +—Cocoa
|   |   \—Emacs.base
|   |       \—Contents
|   |           \—Resources
|   +—GNUstep
|   |   \—Emacs.base
|   |       \—Resources
|   \—templates
+—nt
|   +—icons
|   \—inc
|       +—arpa
|       +—netinet
|       \—sys
+—oldXMenu
+—site-lisp
\—src
\—bitmaps

A quite complicate file structure for emacs 24.5. There are several limitations for this command.

  1. It can’t control the iteration depth
  2. When display with files it doesn’t generated the dash lines which is not clearly to indicate the file structure
  3. If we could give a depth parameter I also want to display the sub items as ellipsis to indicate there is something under but which is omitted

So I use python to write a custom version to enhance this command called treex. It support generated the same structure as the tree command but also provide additional control switch. The source code is already pushed to my personal repository in GitHub. Feel free to check it out.

The help information is

usage: treex.py [-h] [-f] [-d DEPTH] [-m] [-e] path

A Cmd Line Tool for Graphically displays the folder structure of a drive or
path

positional arguments:
path

optional arguments:
-h, –help            show this help message and exit
-f, –file            Display the names of the files in each folder
-d DEPTH, –depth DEPTH
Display the depth number
-m, –mark            Mark the item is file or directory
-e, –ellipsis        Mark the next sub-item with ellipsis

Create by Edwin, Shang(Shang, Erxin) License under MIT. Version 1.0.0

Try to use the treex to generate a depth 2 directory structure

D:\PersonalTools>c:\Python27\python.exe treex.py D:\emacs-24.5 -d 2
Folder path listing
D:\emacs-24.5
+—admin
|   +—charsets
|   +—coccinelle
|   +—grammars
|   +—notes
|   +—nt
|   \—unidata
+—build-aux
|   \—snippet
+—doc
|   +—emacs
|   +—lispintro
|   +—lispref
|   +—man
|   \—misc
+—etc
|   +—charsets
|   +—e
|   +—forms
|   +—gnus
|   +—images
|   +—nxml
|   +—org
|   +—refcards
|   +—schema
|   +—srecode
|   +—themes
|   \—tutorials
+—info
+—leim
|   +—CXTERM-DIC
|   +—MISC-DIC
|   \—SKK-DIC
+—lib
+—lib-src
+—lisp
|   +—calc
|   +—calendar
|   +—cedet
|   +—emacs-lisp
|   +—emacs-parallel
|   +—emulation
|   +—erc
|   +—eshell
|   +—gnus
|   +—international
|   +—language
|   +—leim
|   +—mail
|   +—mh-e
|   +—net
|   +—nxml
|   +—obsolete
|   +—org
|   +—play
|   +—progmodes
|   +—term
|   +—textmodes
|   +—url
|   \—vc
+—lwlib
+—m4
+—msdos
+—nextstep
|   +—Cocoa
|   +—GNUstep
|   \—templates
+—nt
|   +—icons
|   \—inc
+—oldXMenu
+—site-lisp
\—src
\—bitmaps

Here is another result for generate with ellipsis and marks

D:\PersonalTools>c:\Python27\python.exe treex.py D:\emacs-24.5 -d 2 -e -m
Folder path listing
D:\emacs-24.5
[d]+—admin
[d]|   +—charsets
[d]|   |   \—…
[d]|   +—coccinelle
[d]|   +—grammars
[d]|   +—notes
[d]|   +—nt
[d]|   \—unidata
[d]+—build-aux
[d]|   \—snippet
[d]+—doc
[d]|   +—emacs
[d]|   +—lispintro
[d]|   +—lispref
[d]|   +—man
[d]|   \—misc
[d]+—etc
[d]|   +—charsets
[d]|   +—e
[d]|   +—forms
[d]|   +—gnus
[d]|   +—images
[d]|   |   +—…
[d]|   +—nxml
[d]|   +—org
[d]|   +—refcards
[d]|   +—schema
[d]|   +—srecode
[d]|   +—themes
[d]|   \—tutorials
[d]+—info
[d]+—leim
[d]|   +—CXTERM-DIC
[d]|   +—MISC-DIC
[d]|   \—SKK-DIC
[d]+—lib
[d]+—lib-src
[d]+—lisp
[d]|   +—calc
[d]|   +—calendar
[d]|   +—cedet
[d]|   |   +—…
[d]|   +—emacs-lisp
[d]|   +—emacs-parallel
[d]|   +—emulation
[d]|   +—erc
[d]|   +—eshell
[d]|   +—gnus
[d]|   +—international
[d]|   +—language
[d]|   +—leim
[d]|   |   +—…
[d]|   +—mail
[d]|   +—mh-e
[d]|   +—net
[d]|   +—nxml
[d]|   +—obsolete
[d]|   +—org
[d]|   +—play
[d]|   +—progmodes
[d]|   +—term
[d]|   +—textmodes
[d]|   +—url
[d]|   \—vc
[d]+—lwlib
[d]+—m4
[d]+—msdos
[d]+—nextstep
[d]|   +—Cocoa
[d]|   |   \—…
[d]|   +—GNUstep
[d]|   |   \—…
[d]|   \—templates
[d]+—nt
[d]|   +—icons
[d]|   \—inc
[d]|       +—…
[d]+—oldXMenu
[d]+—site-lisp
[d]\—src
[d]    \—bitmaps

The key technical point is the depth first traversal algorithms, and I implement it with nonrecursive mode to reduce the stack usage.

The other key point is how to generate the graphic. There is a pattern between the second line and the previous line. So I use it. The implementation could be found from the source.

That’s all. Happy coding.